
SAP SuccessFactors → ServiceDesk Plus Cloud Integration
This integration establishes a uni-directional data flow from SAP SuccessFactors (SF) to ServiceDesk Plus (SDP) Cloud. SuccessFactors acts as the system of record for employee data and enables automatic, near‑real‑time synchronization of user information into SDP. This streamlines user account lifecycle management and reduces manual administrative effort for onboarding and offboarding.
Key Features
- Automated Employee Synchronization: Seamlessly sync employee data from SAP SuccessFactors to ServiceDesk Plus with minimal manual effort.
- Real-Time Lifecycle Updates: Instantly reflects employee creation, updates, and terminations, keeping user records accurate.
- Flexible Field Mapping: Map standard and custom SAP SuccessFactors fields to ServiceDesk Plus fields for precise data alignment.
- Improved ITSM Efficiency: Reduces administrative overhead by automating onboarding and offboarding workflows within ServiceDesk Plus.
Required Roles
SDOrgAdmin, SAP Admin Access
ServiceDesk Plus Cloud Configuration
Follow these steps in SDP to enable and configure the integration and administrative widgets used to manage tasks and mapping.
Install the SAP SuccessFactors extension in ServiceDesk Plus Cloud
- Navigate to
Setup → Apps & Add‑ons → Extensionsand install the SAP SuccessFactors extension (or install from ManageEngine Marketplace). - The integration is enabled by default during installation. To stop data flow, disable the integration from the extension configuration.
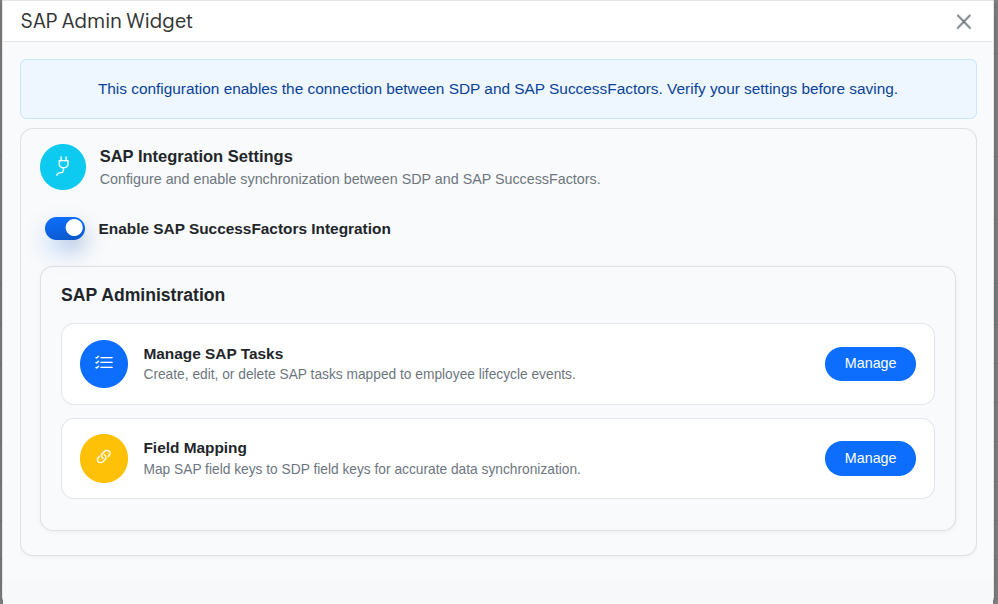
SAP Admin Config
The SAP Admin Config configures the connection between SDP and SuccessFactors. Verify settings before saving. Key areas:
- Enable SAP SuccessFactors Integration: Toggle to enable or disable synchronization.
- SAP Administration: Manage SAP tasks and lifecycle mappings.
- Field Mapping: Map SAP payload fields to SDP custom fields.
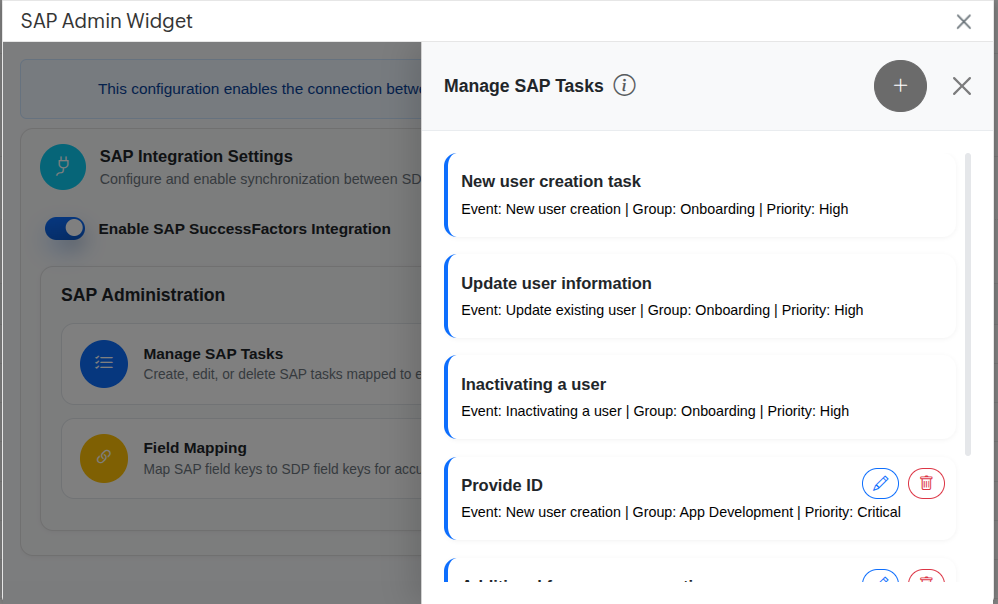
Configure Required Tasks
Tasks are created as sub‑tasks under the corresponding SDP ticket and are visible in the ticket’s Tasks section.
Task types:
- Mandatory tasks — used for traceability of user account management.
- Optional tasks — can be added, edited, or deleted by users. (Only optional tasks are editable/deletable.)
Add a new task:
- Open Admin Config →
Manage (SAP tasks). - Click the
(+)icon, provide event type, task name, group, priority, thenAdd→ Save.
Edit a task: Manage → click edit icon → update details → Save edit → Save.
Delete a task: Manage → click bin icon → Click delete to confirm deletion.
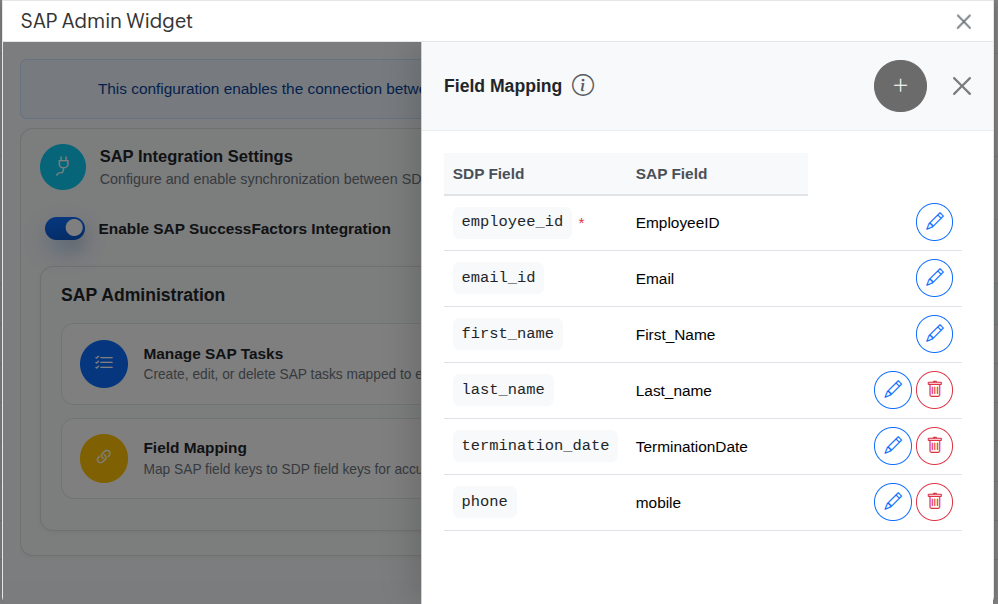
Configure field mapping
- Field mapping links SuccessFactors fields to SDP fields to ensure correct data flow. From Admin Config choose View Mapping and map required fields (e.g., employee ID, first name, last name, email) →
Save. - Additional fields can be added and configured in admin config (e.g., mobile, job title).
Add a new field:
- Open Admin Config →
Manage(Field Mapping). - Click the
(+)icon, provide the SDP and SAP key fields thenAdd→ Save.
Edit field: Manage → click edit icon → update details → Click tick icon → Save.
Delete field: Manage → click bin icon → Click delete to confirm deletion.
Configure dashboard for SAP integration in ServiceDesk Plus
A custom dashboard is configured to monitor SAP‑related tickets created by the integration. Steps:
- From SDP home, click
(+ New)→Customize→ Selectwidget column as 2 columns→ Selectpublic in access level. - Choose
Custom widget→ select theSAP Dashboardwidgets →Update layout.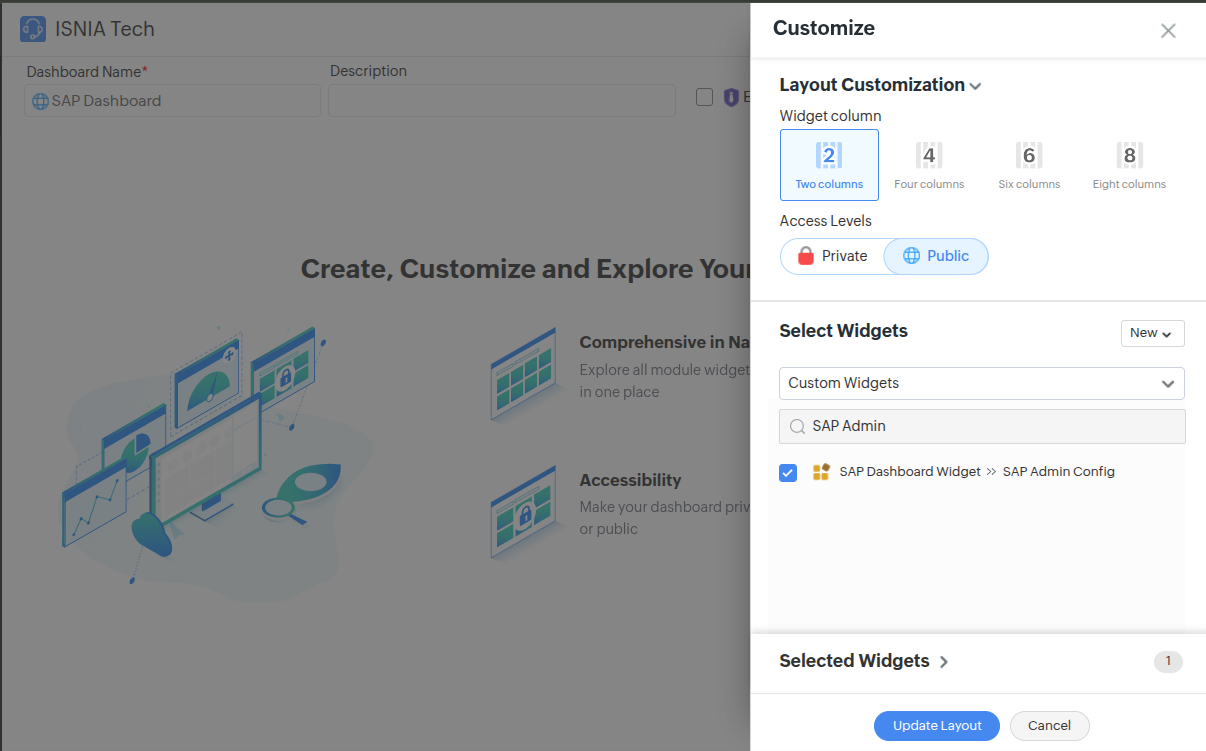
Drag the dashboard widget downwardto improve visibility.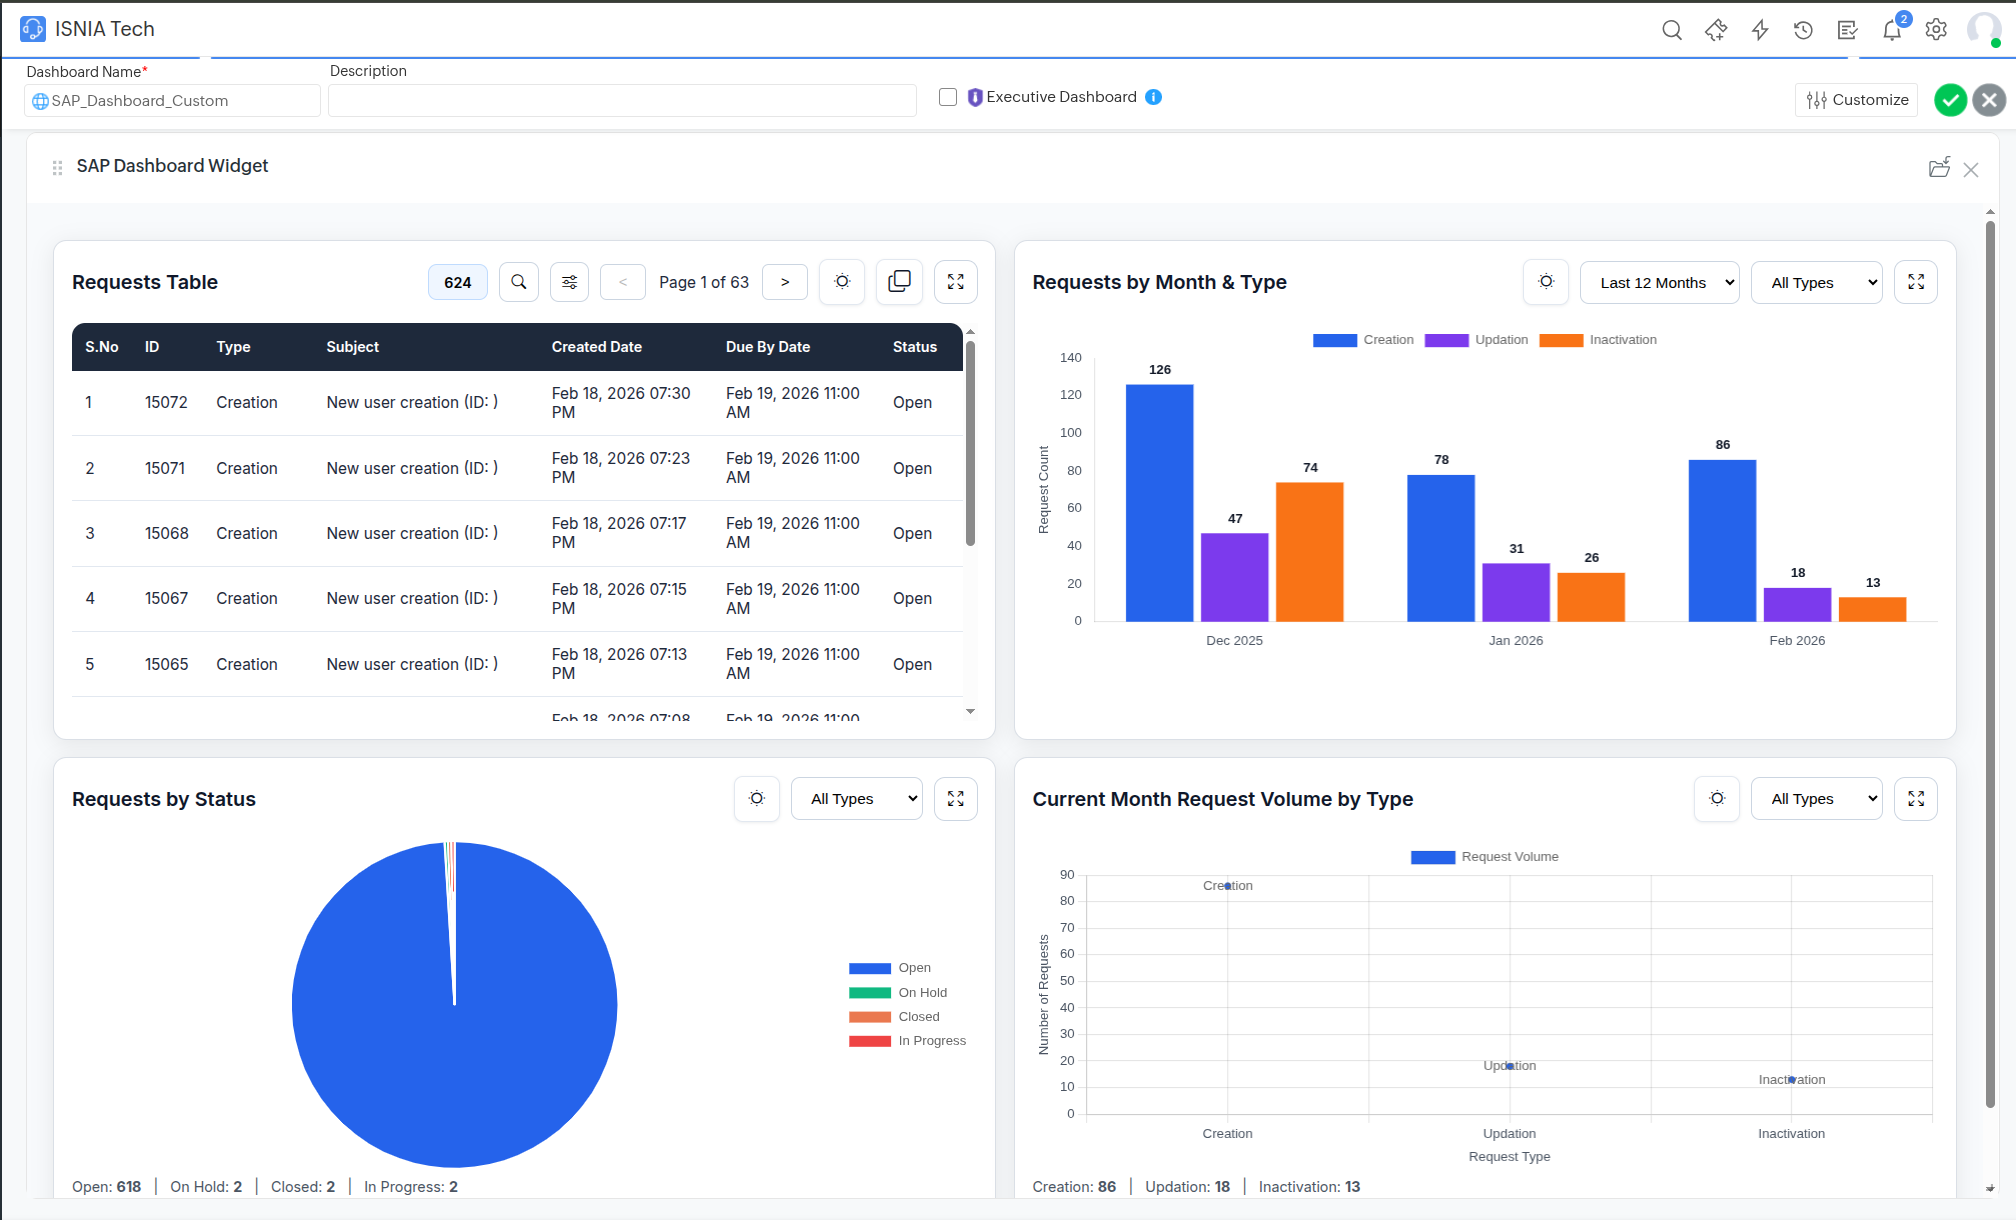
- Provide
dashboard name and save.
The dashboard should include charts and reports for month‑wise and type‑wise ticket analysis. The following widgets are recommended for SAP‑related request monitoring:
1. Requests Table (Detailed View)
The requests table provides a detailed, row‑level view of all SAP‑related requests included in the dashboard. Use this widget for search, filtering, and audit‑friendly reporting.
- Displayed columns: S.No (sequential number), ID (request ID), Type (Creation / Updation / Inactivation), Subject (request subject), Created Date (request creation timestamp), Due By Date (SLA / due date), and Status (current request status).
- Purpose: Enable detailed inspection of individual requests and allow search / filter by type, subject, or other attributes.
- Key features: Pagination for performance optimization, integrated search and filter, fullscreen expansion for large data review, and one‑click copy or export for reporting or audit purposes.
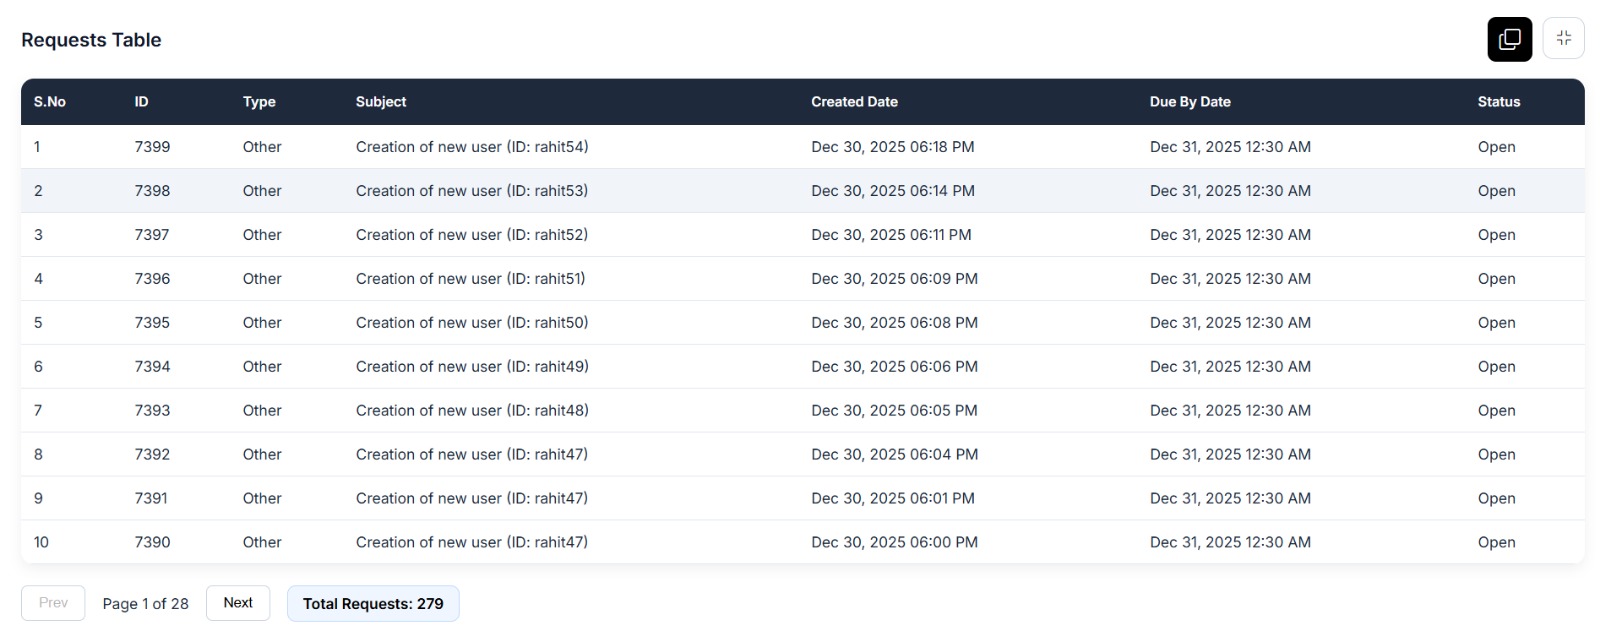
2. Requests by Month & Type (Bar Chart)
This bar chart displays the number of SAP requests created each month, categorized by request type. It helps you understand request trends over time and compare workload across different request categories.
- Request types covered: Creation (new user creation requests), Updation (existing user / data update requests), and Inactivation (user deactivation requests).
- Purpose: Identify monthly request trends, compare workload distribution across request types, analyze peak periods / seasonal patterns, and support capacity and resource planning.
- Key features: Year‑based and last‑12‑month filtering, visual comparison of request volumes, and support for fullscreen view for detailed analysis.
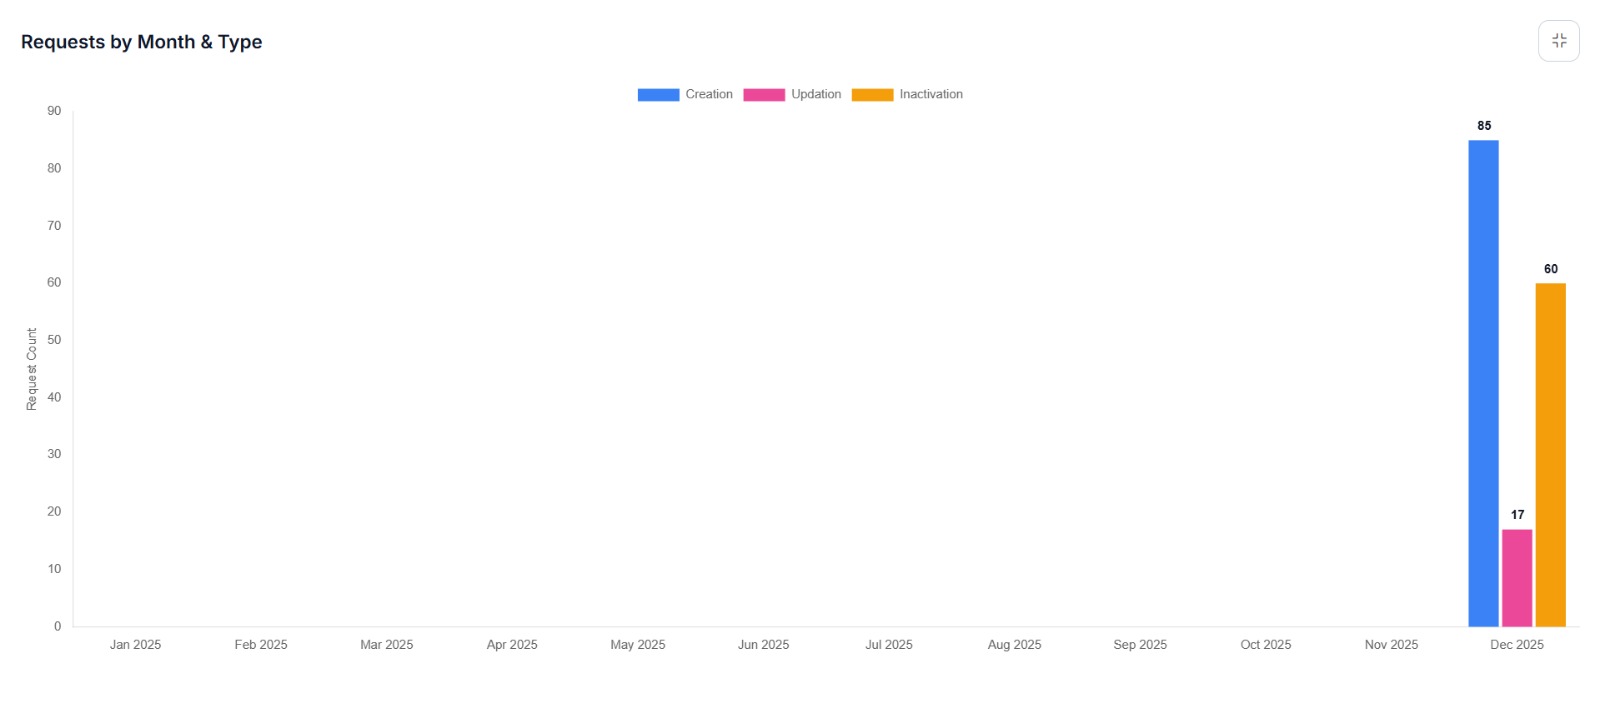
3. Requests by Status (Pie Chart)
This pie chart shows the distribution of SAP requests based on their current status. It provides a quick, percentage‑based view of the overall health of SAP‑related tickets.
- Example status values: Open, In Progress, On Hold, Completed, Closed, and other custom statuses as configured in SDP.
- Purpose: Quickly assess overall request health, monitor backlog versus completed requests, and identify bottlenecks in request processing.
- Key features: Percentage‑based representation, status‑wise summary displayed below the chart, and suitability for operational monitoring and reporting.
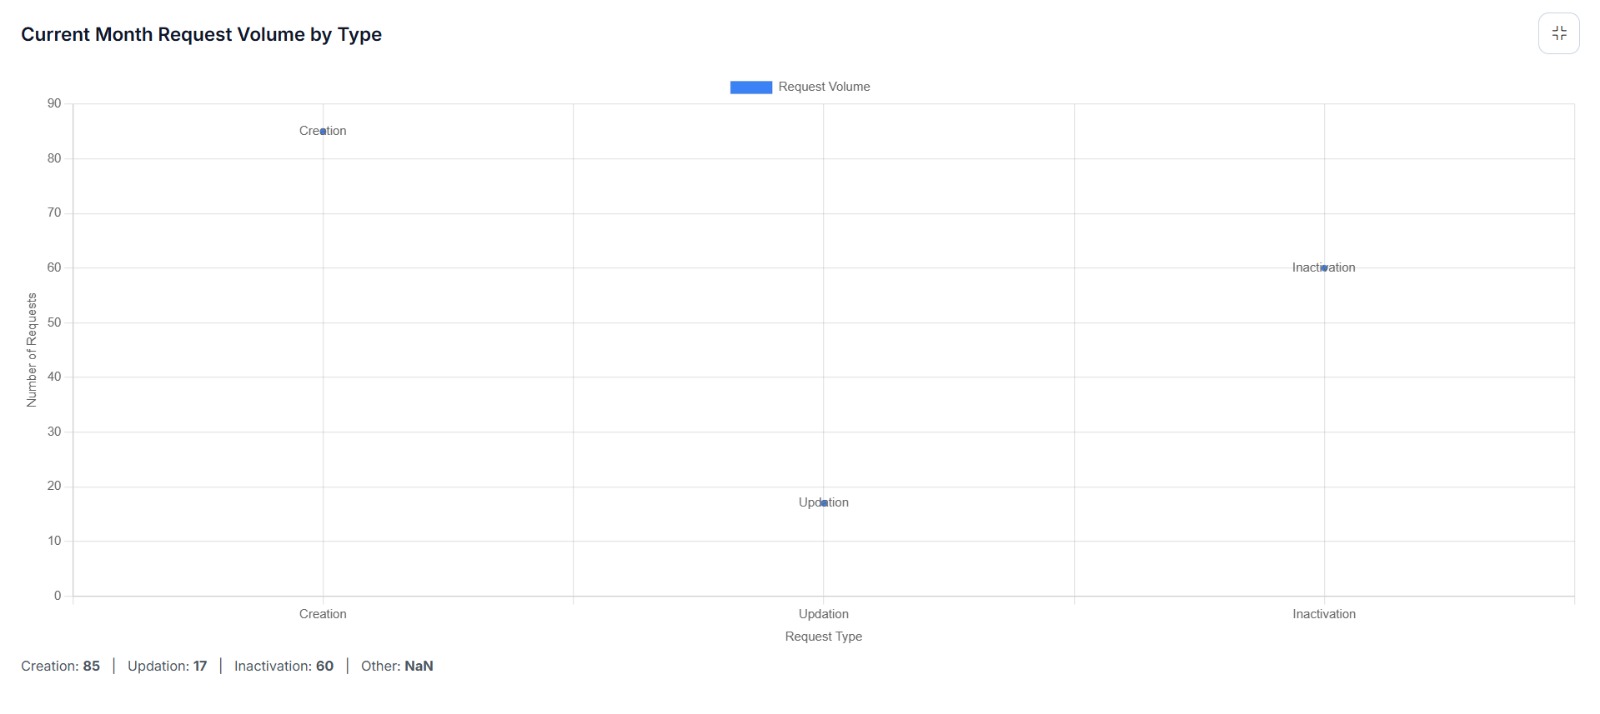
4. Current Month Request Volume by Type (Scatter / Bubble Chart)
This chart visualizes the volume of SAP requests for the current month, grouped by request type. It is useful for focused analysis of the current month workload.
- Axes: X‑axis – request type (Creation, Updation, Inactivation); Y‑axis – number of requests; bubble size – intensity of request volume.
- Purpose: Identify dominant request types for the ongoing period and support short‑term planning and prioritization.
- Key features: Dynamic data based on the current month, summary values displayed below the chart, and expandable view for better visibility.
SAP SuccessFactors configuration
Configure SuccessFactors to send employee lifecycle events to SDP by building integrations in Integration Center and wiring them to Intelligent Services Center (ISC) events where applicable.
Integration in SAP SuccessFactors
Configure integrations that get triggered on employee events and POST JSON payloads to the SDP callback endpoint.
- The only differences between Intelligent Service and Scheduled integrations are trigger mechanism and event configuration. Scheduled integrations do not require explicitly attaching to ISC events.
- Configure events corresponding to actions such as user creation, update and termination in the integration.
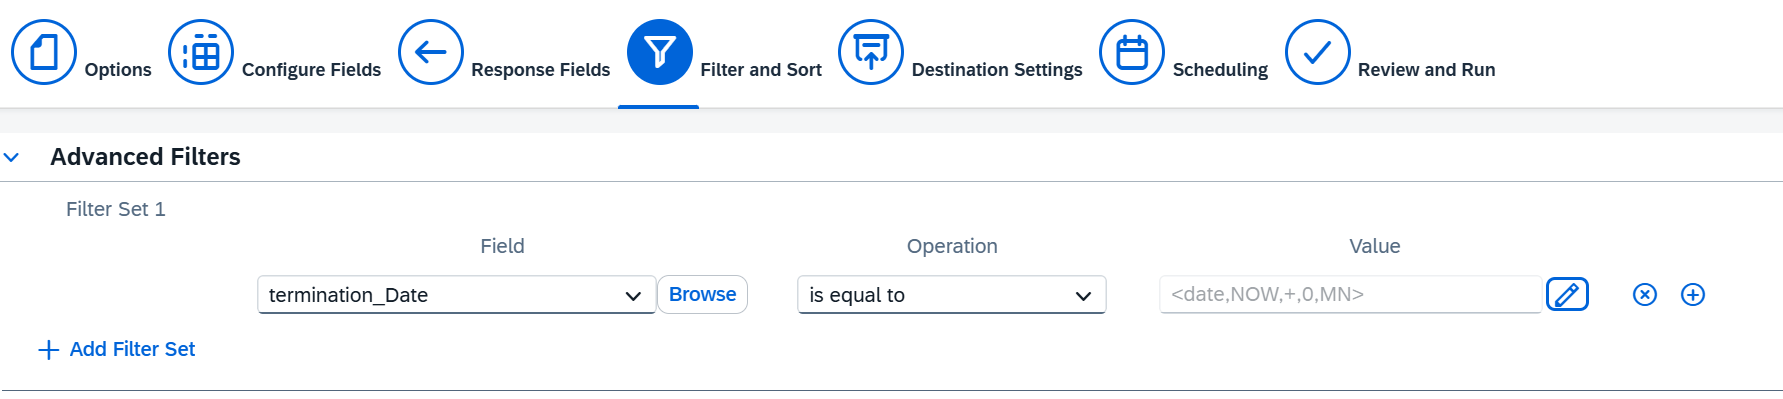
- For Scheduled based integration which is for termination, set filter for termination date to Now.
Types of integration:
- Intelligent Service — typically used for create/update events.
- Scheduled — typically used for termination (run daily with a termination_date filter).
Key integration settings:
- Navigate to
Integration Center → My Integrations → Create → More integration types.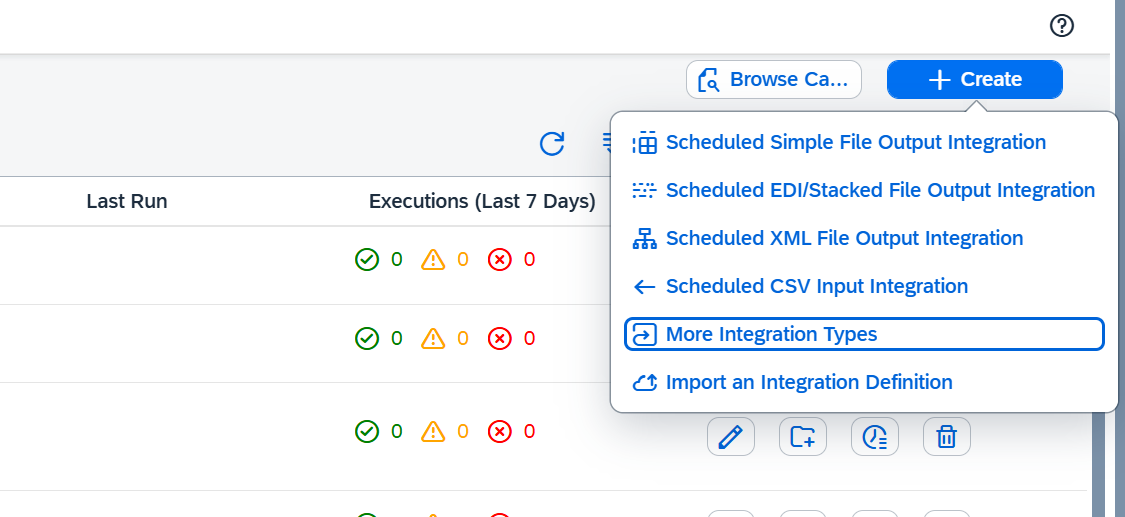
- Trigger type: Intelligent Service or Scheduled (events are configured based on the selected trigger type).
- Source type: SuccessFactors; Destination type: REST; Format: JSON.
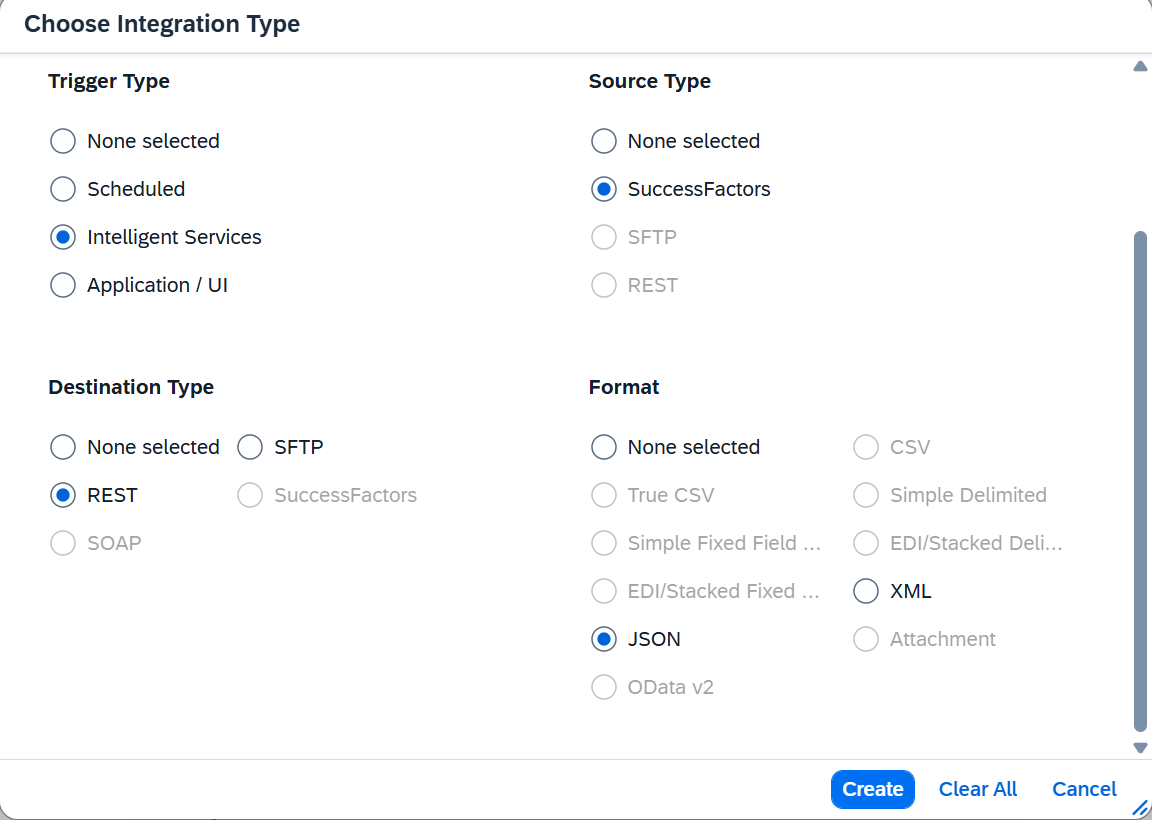
- Select the appropriate event based on integration type (E.g.,Update a Candidate Profile – Creation/Update, empEmployementTermination – Termination).
- Configure fields to include only required attributes (candidate/user ID, name, email, employment fields).
Note: Mandatory fields are candidate/user Id, email, first name.
- Set Destination REST endpoint to the
SDP callback URLand HTTP method to POST.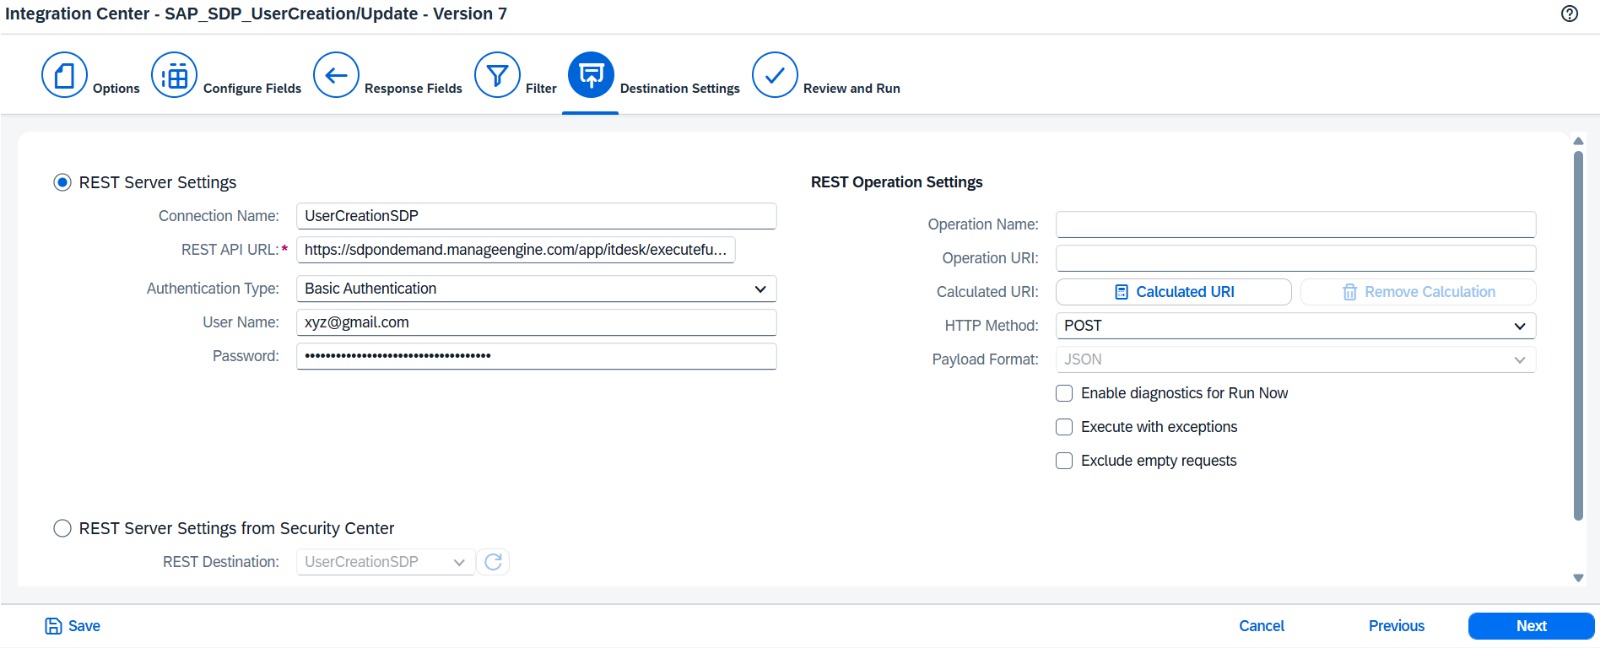
- Review and
save the integration. - For Intelligent Service integrations, attach the integration to the corresponding Intelligent Services Center (ISC) event.
How to configure the Callback URL for the Destination settings
- After installing the extension in SDP, go to
Setup → Custom Callback functions.Note: Use 'SAPCallback' URL for User Creation and User Updation.
Use 'SAPUserTermination' URL for the User Termination. - Select the callback function reflected from the extension and copy the URL.
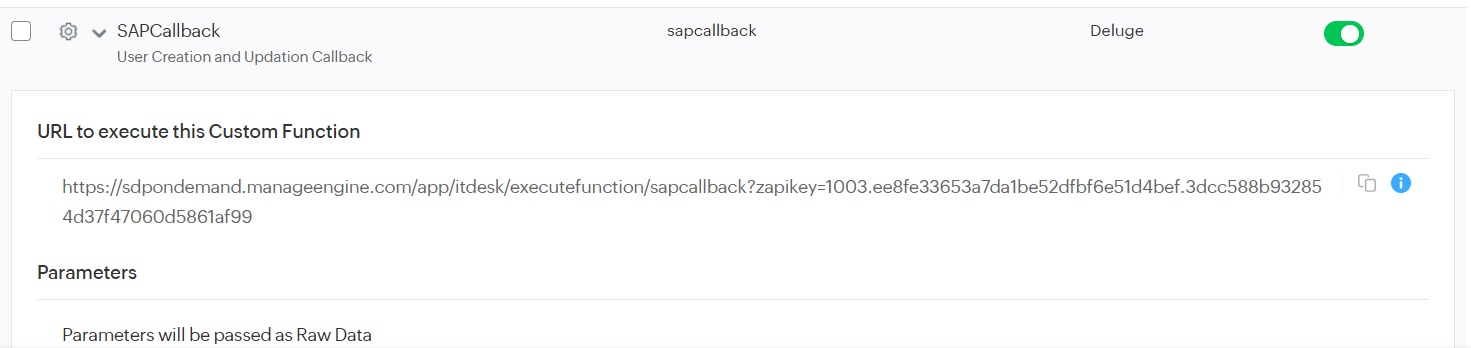
- Paste the copied URL in the Destination setting of the SAP integration.
Event configuration in SAP Intelligent Services Center (ISC)
Intelligent Services Center (ISC) monitors employee lifecycle events such as hires and terminations. For Intelligent Service–based integrations, attach the integration to the appropriate ISC event (e.g., 'Update a Candidate Profile').
- Go to
Intelligent Service Center→ SelectUpdate a Candidate Profileevent. - Under Integration, add
the created integration. Andsave the flow.
Disclaimer
The User APIs used in this extension may change over time. Any changes will be communicated with prior notice; API changes generally occur on multi‑year cadence.
Support
If you need assistance configuring the integration, contact your SDP administrator or the ManageEngine support channels. Provide integration logs and example payloads to speed troubleshooting.