
Snowflake Integration for ServiceDesk Plus Cloud
The Snowflake Integration for ServiceDesk Plus Cloud enables users to access historical incident and change insights directly within ServiceDesk Plus using data stored in Snowflake. Through configurable query templates, technicians can quickly retrieve relevant historical information without leaving the ServiceDesk Plus Cloud interface.
The extension helps analyze similar incidents, requester history, change trends, and other historical patterns directly from the ticket details page. By providing contextual analytics within the workflow, it accelerates root-cause analysis, improves troubleshooting efficiency, and enables more informed, data-driven decision-making.
Key Features
- Template-Based Historical Analytics – Execute predefined and configurable Snowflake query templates to retrieve historical incident and change insights directly within ServiceDesk Plus.
- Dynamic and Context-Aware Analysis – Refine analytics results at runtime using incident- or change-specific criteria for more relevant insights.
- Seamless Snowflake Integration – Securely run Snowflake SQL queries from within ServiceDesk Plus, eliminating the need to switch between platforms.
- Flexible Data Mapping and Module Support – Support analytics for both Incident and Change modules with configurable field mappings for accurate business-specific data alignment.
Role Required
SDOrgAdmin, Snowflake Admin (ACCOUNTADMIN)
ServiceDesk Plus Cloud Configuration
Install the Snowflake extension in ServiceDesk Plus Cloud and configure the integration settings to enable analytics.
Install the Snowflake extension in ServiceDesk Plus Cloud
- Navigate to
Setup → Apps & Add‑ons → Extensionsand install the Snowflake extension (or install from ManageEngine Marketplace). - The integration is enabled by default during installation. To stop data flow, disable the integration from the extension configuration.
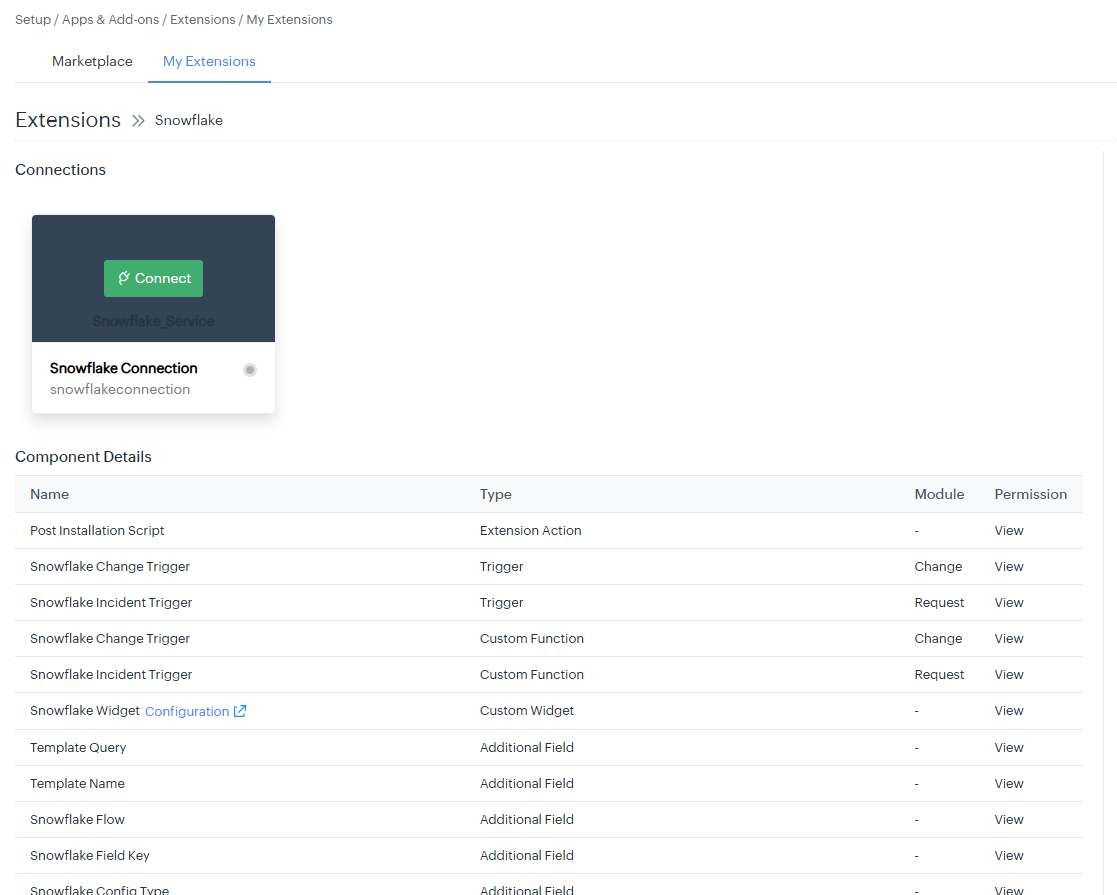
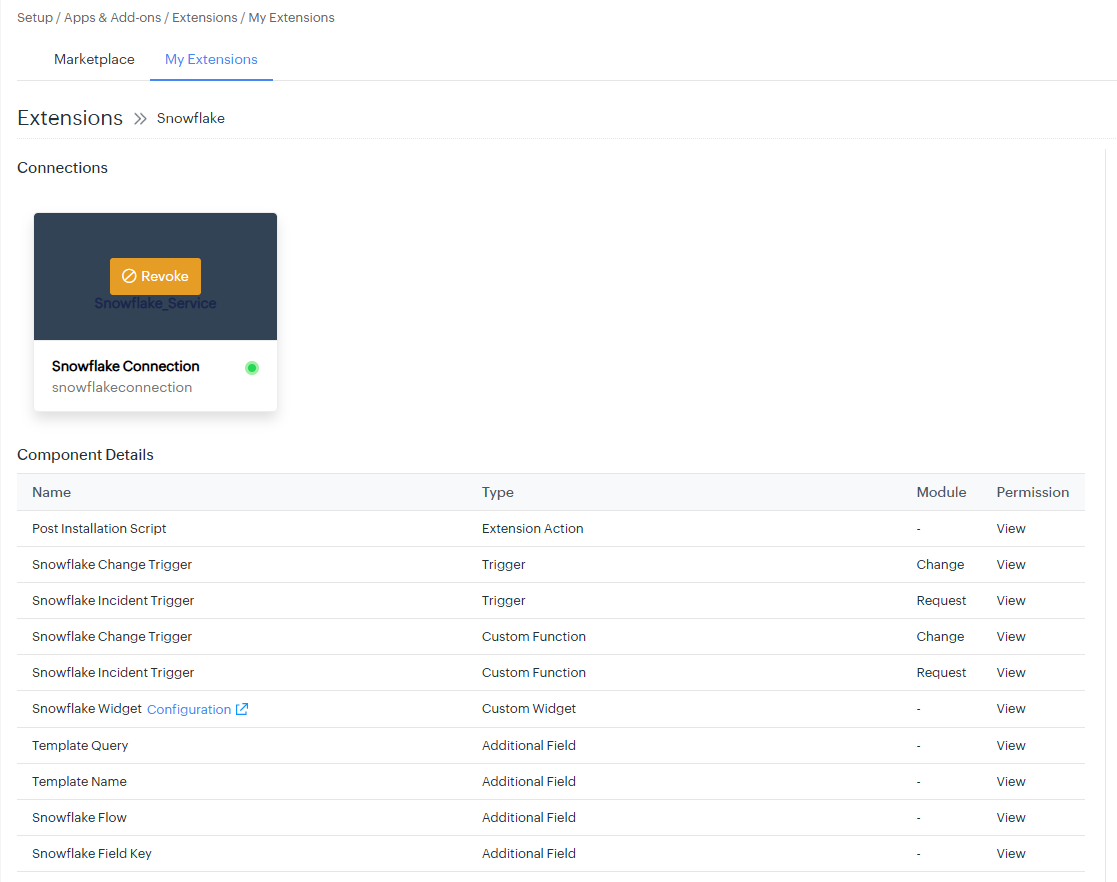
Connection in SDP
- Navigate to
Snowflake extension settings. - In connections, click connect to configure and authorize the Snowflake connection.
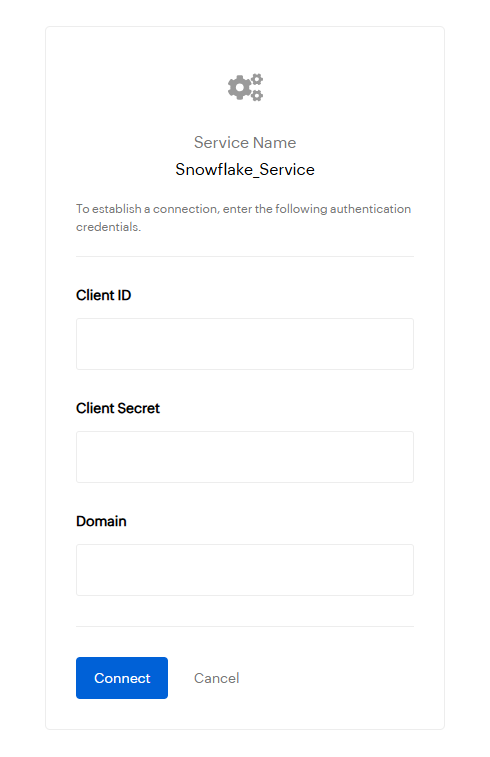
- Provide the Client ID & Secret which will be generated in Snowflake while configuring OAuth.
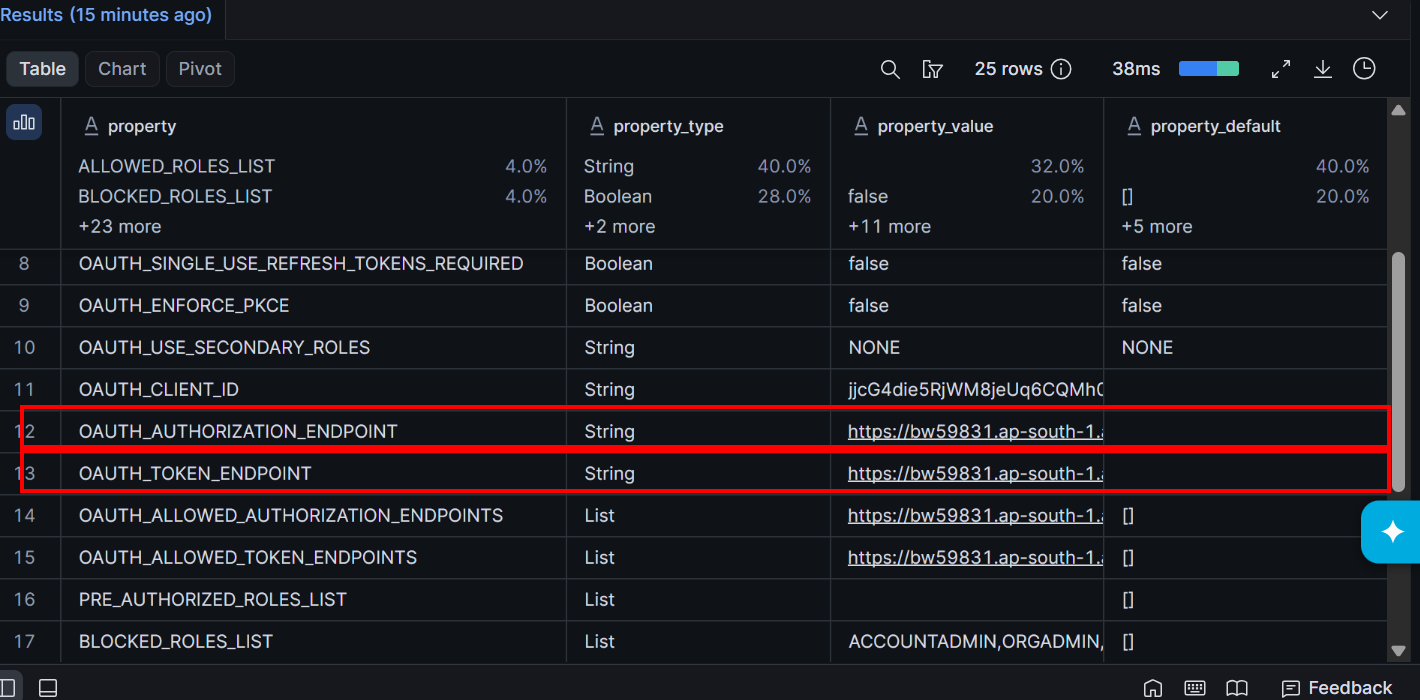
- Provide the domain from the OAUTH_AUTHORIZATION_ENDPOINT (https://yourDomain.snowflakecomputing.com/oauth/authorize) to be used in the authorize and token endpoints.
Example:https://bw59831.ap-south-1.aws.snowflakecomputing.com/oauth/authorize, Refer to OAuth Integration. - After navigating to login page, use created user (SDP_INTEGRATION_USER) from snowflake for login, Refer to User Creation.
Snowflake Admin Widget
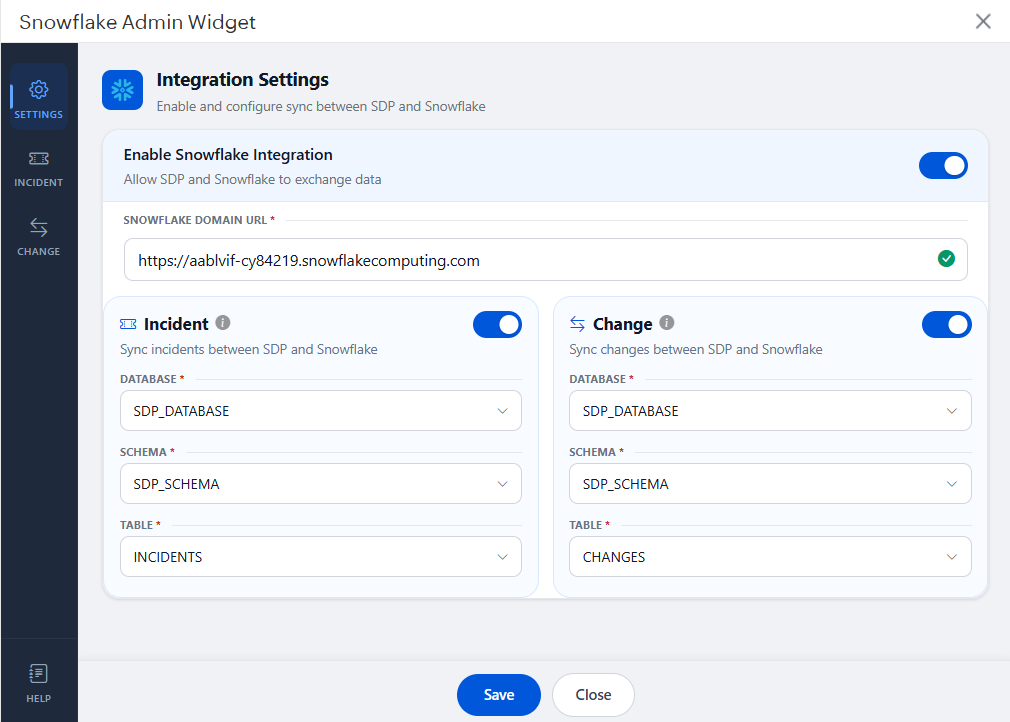
The Snowflake Admin Widget is used to configure and manage the integration settings between Snowflake and ServiceDesk Plus Cloud.
Note: Complete the Snowflake configuration, including OAuth authorization and other required configuration, before using the integration. The Admin Widget will not sync or update data until the configuration is finished Refer to Snowflake configuration.
Navigate to the Snowflake extension settings to configure the integration through the configuration.
Key Configuration Settings
- Enable Snowflake Integration: Toggle to enable or disable synchronization between Snowflake and SDP.
- Incident Sync Direction: Configure synchronization between both systems.
- Snowflake Domain URL: Provide the Snowflake domain URL based on your organization’s service region (e.g.
https://yourOrg-yourDomain.snowflakecomputing.com). - Incident & Change Table Data: Provide the Database, Schema, and Table names from Snowflake.
Note: Ensure the Incident & Change tables exist in Snowflake before configuring sync.
Incident Module
Configure the field mapping and the templates for the Incident module. Complete the field mapping first, because the template page can be saved only after the fields required by the selected templates are mapped.
Configure Field Mapping
Field mapping ensures accurate synchronization of data between Snowflake columns and ServiceDesk Plus Cloud in both directions.
- Open the Snowflake Admin Widget.
- Navigate to
Incident → View Field Mapping. - Map the required fields (e.g., Status, Priority, Mode).
- Click Save.
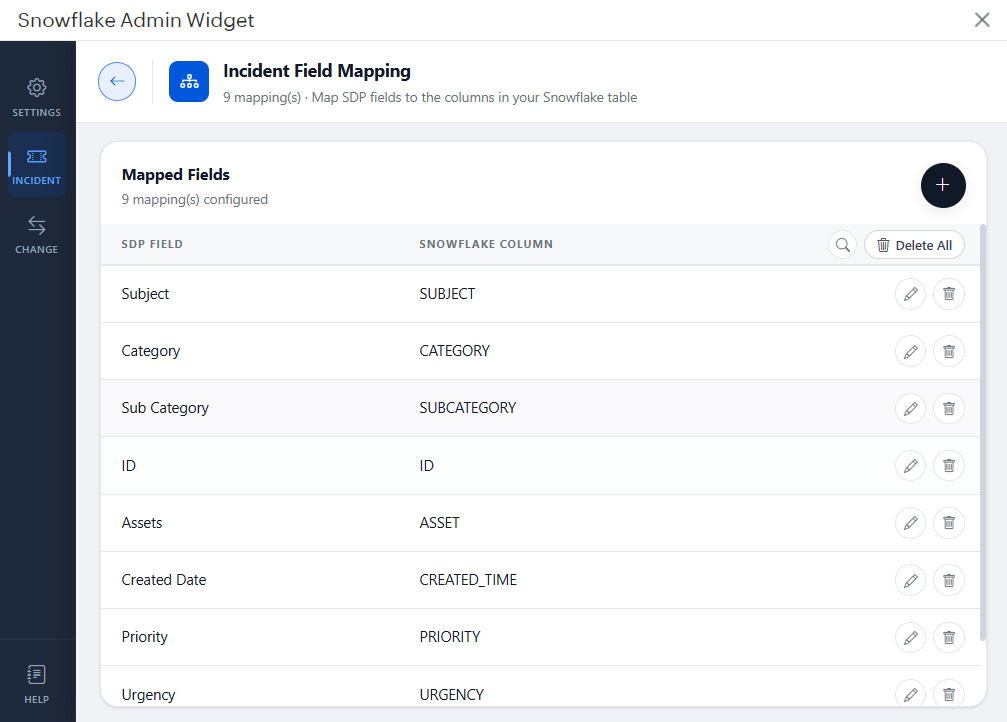
Edit Field Mapping
- Navigate to
Incident → View Field Mapping. - Click the edit icon.
- Update the SDP Value or Snowflake Value.
- Click the Save icon.
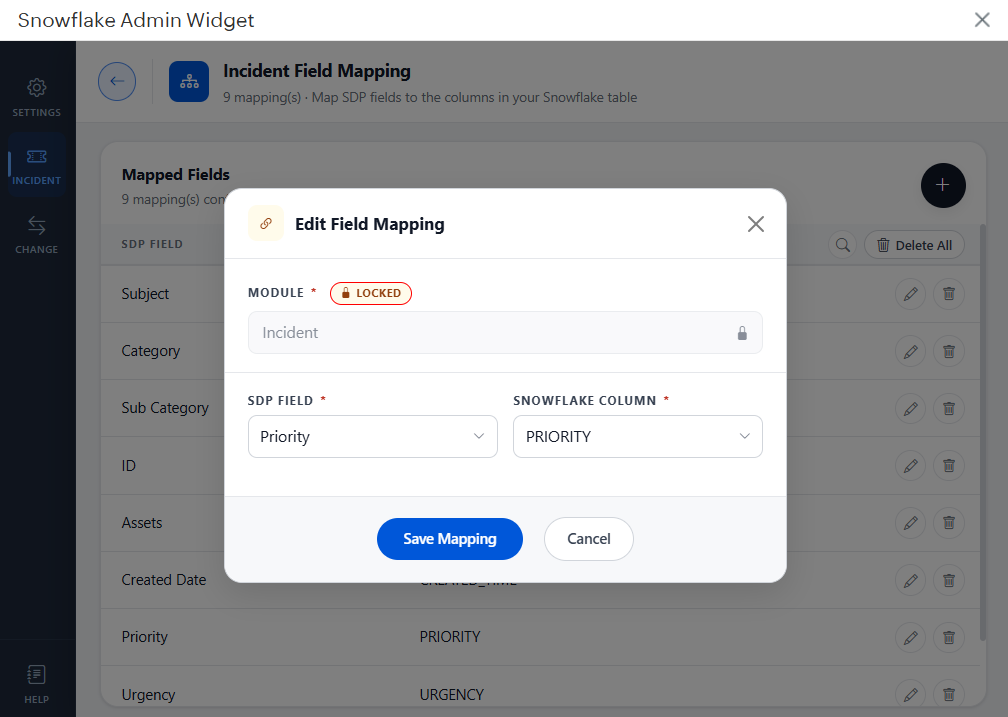
- Mapping for "id" is mandatory which is required to update records in Snowflake.
- Ensure that the mapping is accurate to avoid data inconsistencies.
- Field mappings should be configured for all the fields required for the selected templates.
Configure Incident Templates
Incident templates define the types of historical incident analyses that can be displayed to technicians. Select the templates that best suit your organization's requirements.
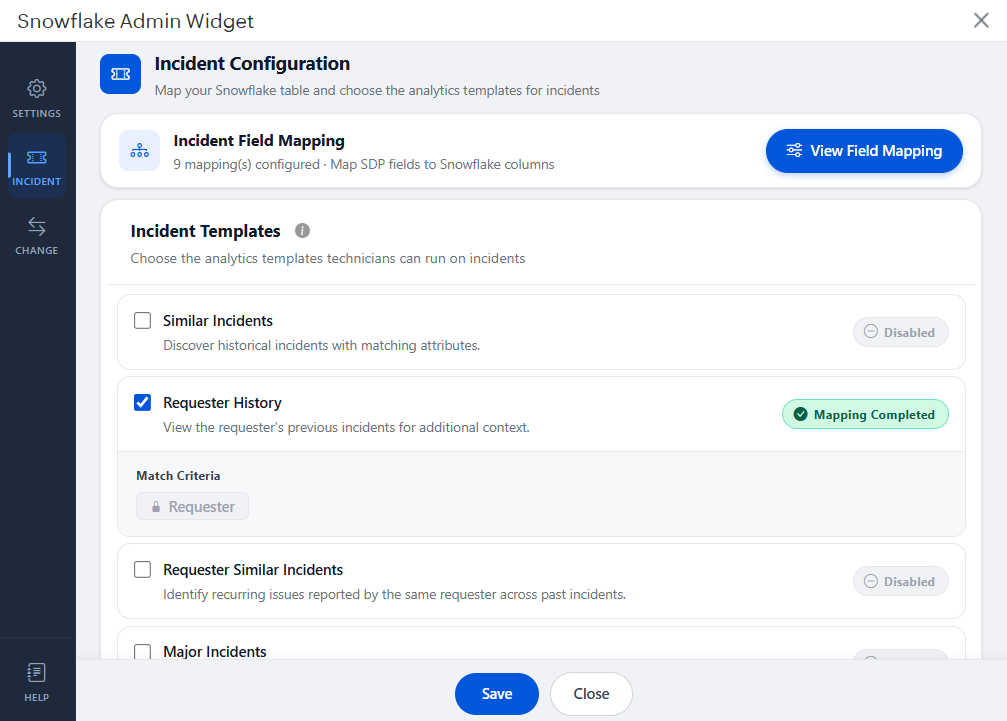
The template page can be saved only after the field mappings required by the selected templates are configured. If a criterion (for example, Category) is selected but has no field mapping, the template cannot be saved. Complete the Incident field mapping first.
- Default criteria cannot be removed. Additional criteria can be added to further refine matching.
- Ensure that field mappings are configured for all selected criteria. Only mapped fields will be used during incident matching.
Criteria Mapping Reference
The following table lists the criteria fields required for each template and their corresponding Snowflake field mappings. Ensure these mappings are configured in the Incident field mapping.
| Template | Criteria | Required Field Mapping |
|---|---|---|
| Similar Incidents | Subject | Subject → Snowflake Subject |
| Category | Category → Snowflake Category | |
| Subcategory | Subcategory → Snowflake Subcategory | |
| Item | Item → Snowflake Item | |
| Description | Description → Snowflake Description | |
| Asset | Asset → Snowflake Asset | |
| Requester History | Requester | Requester → Snowflake Requester |
| Requester Similar Incidents | Requester | Requester → Snowflake Requester |
| Subject | Subject → Snowflake Subject | |
| Category | Category → Snowflake Category | |
| Subcategory | Subcategory → Snowflake Subcategory | |
| Item | Item → Snowflake Item | |
| Description | Description → Snowflake Description | |
| Asset | Asset → Snowflake Asset | |
| Major Incidents | Priority | Priority → Snowflake Priority |
| Urgency | Urgency → Snowflake Urgency | |
| Key Identifier for updating records from SDP in Snowflake | Incident Id (id) | Incident Id → Snowflake Incident Id |
| Created Time | Created Time → Snowflake created time |
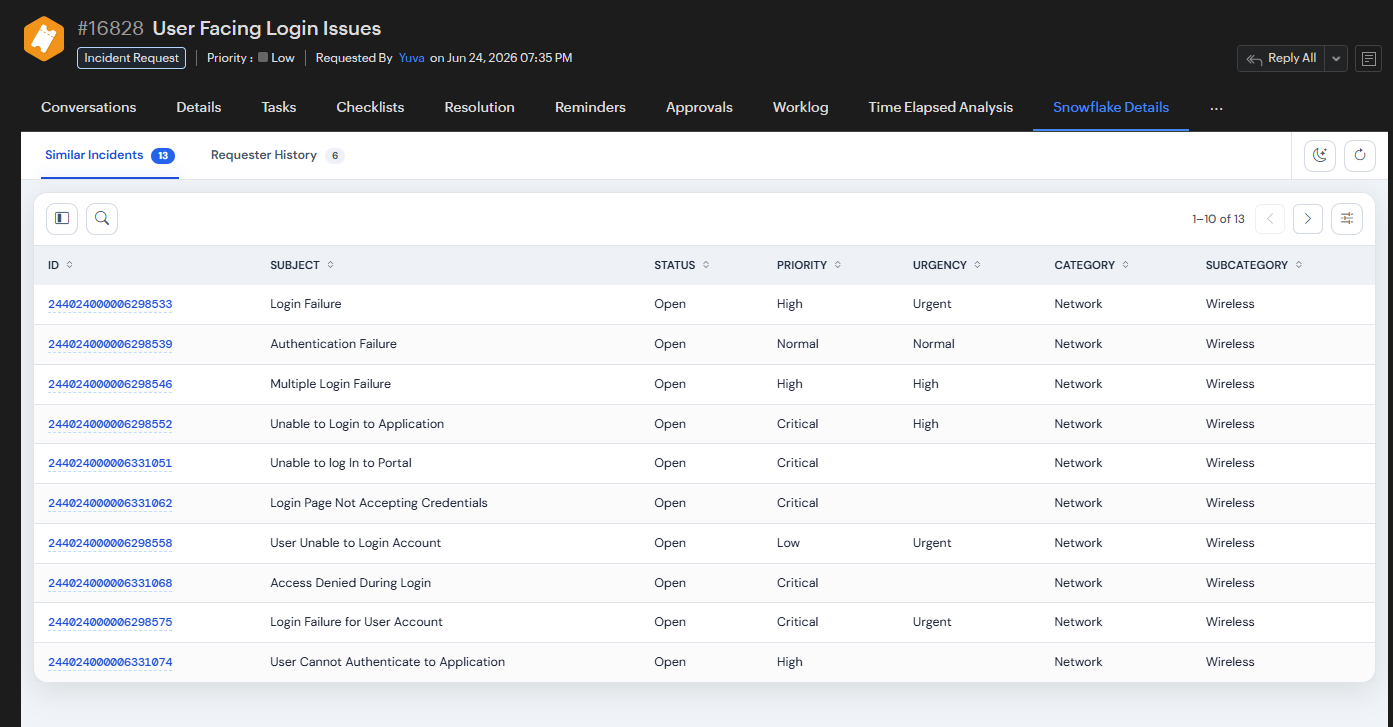
Similar Incidents
Displays historical incidents that match the configured criteria, helping technicians identify related issues and reuse previous resolutions.
Requester History
Displays incidents previously raised by the requester, providing additional context about their past issues and interactions.
Requester Similar Incidents
Identifies recurring issues reported by the same requester by displaying past incidents that match the configured criteria.
Major Incidents
Displays historical high-impact incidents with similar priority and urgency levels, helping technicians analyze previous major disruptions and their resolutions.
Change Module
Configure the field mapping and the templates for the Change module. Complete the field mapping first, because the template page can be saved only after the fields required by the selected templates are mapped.
Configure Field Mapping
Configure the Change field mapping the same way as the Incident field mapping, by navigating to Change → View Field Mapping. Refer to Configure Field Mapping for the steps to map and edit fields.
The mapping for "id" is mandatory for Change as well. Map all the fields required by the selected change templates, as listed in the Criteria Mapping Reference.
Configure Change Templates
Change templates define the types of historical change analyses that can be displayed to change managers and technicians. Select the templates that best suit your organization's requirements.
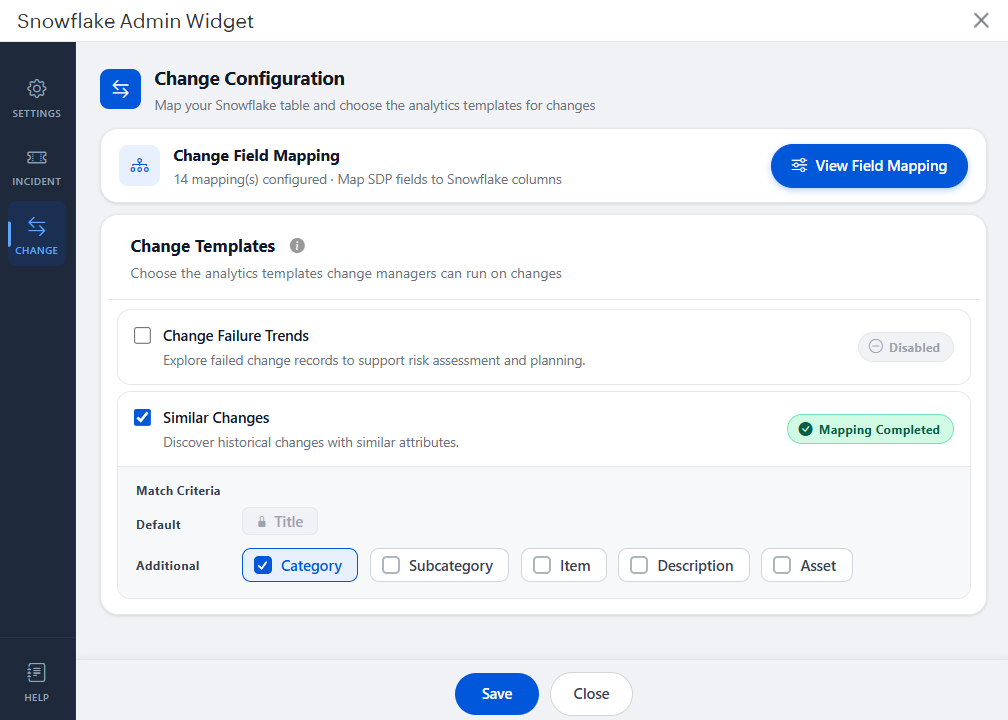
The template page can be saved only after the field mappings required by the selected templates are configured. If a criterion (for example, Category) is selected but has no field mapping, the template cannot be saved. Complete the Change field mapping first.
Criteria Mapping Reference
The following table lists the criteria fields required for each template and their corresponding Snowflake field mappings. Ensure these mappings are configured in the Change field mapping.
| Template | Criteria | Required Field Mapping |
|---|---|---|
| Change Failure Trends | Status | Status → Snowflake Status |
| Created Time | Created Time → Snowflake Created Time | |
| Similar Changes | Subject | Subject → Snowflake Subject |
| Category | Category → Snowflake Category | |
| Subcategory | Subcategory → Snowflake Subcategory | |
| Item | Item → Snowflake Item | |
| Description | Description → Snowflake Description | |
| Asset | Asset → Snowflake Asset | |
| Key Identifier for updating records from SDP in Snowflake | Change Id (id) | Change Id → Snowflake Change Id |
| Created Time | Created Time → Snowflake created time |
Change Failure Trends
Displays historical failed change records to help identify recurring issues, assess risks, and improve future change planning.
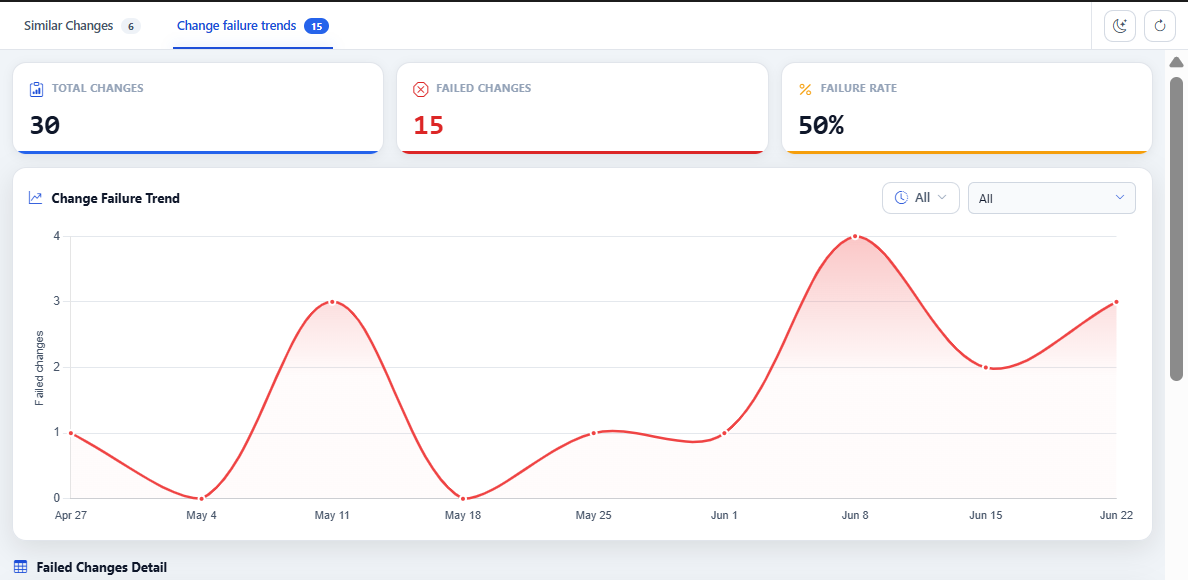
The dashboard summarizes Total Changes, Failed Changes, and the overall Failure Rate, along with a month-wise trend chart of failed changes and a detailed list of failed change records.
Similar Changes
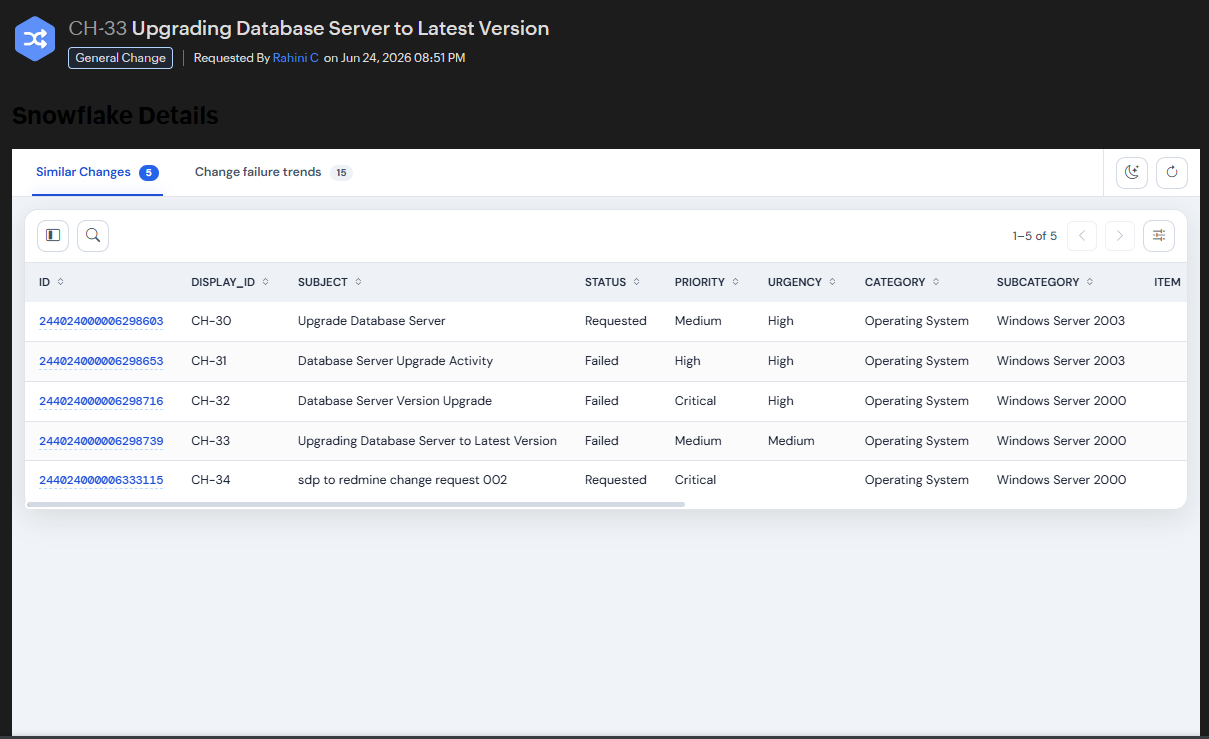
Displays historical changes that match the configured criteria, helping users identify related implementations, understand past outcomes, and reuse successful approaches.
Snowflake Configuration
To complete the integration, configure Snowflake to support authentication and data storage for ServiceDesk Plus Cloud (SDP).
Note:
Run the following SQL statements in Snowflake Worksheets to obtain the values required for the SDP integration setup.
- Login to Snowflake
- Navigate to workspace and add new SQL file for each setup.
OAuth Security Integration
Create an OAuth Security Integration in Snowflake to allow ServiceDesk Plus to authenticate using OAuth.
CREATE SECURITY INTEGRATION YOUR_INTEGRATION_NAME
TYPE = OAUTH
ENABLED = TRUE
OAUTH_CLIENT = CUSTOM
OAUTH_CLIENT_TYPE = 'CONFIDENTIAL'
OAUTH_REDIRECT_URI = 'https://deluge.zoho.com/delugeauth/callback'
OAUTH_ISSUE_REFRESH_TOKENS = TRUE
OAUTH_REFRESH_TOKEN_VALIDITY = 7776000;
Retrieve the generated Client ID and Client Secret:
SELECT SYSTEM$SHOW_OAUTH_CLIENT_SECRETS('YOUR_INTEGRATION_NAME');Verify the integration and retrieve the authorization and token endpoints required to configure the SDP connection:
DESC SECURITY INTEGRATION YOUR_INTEGRATION_NAME;Note: From the results, locate the OAUTH_AUTHORIZATION_ENDPOINT property and OAUTH_TOKEN_ENDPOINT property to copy their values. These will be used to provide domain information in the SDP connection.
User Creation
Create a dedicated user for the SDP integration.
USE ROLE USERADMIN;

CREATE USER YOUR_USER_NAME
PASSWORD = '********'
DEFAULT_WAREHOUSE = YOUR_WAREHOUSE_NAME
MUST_CHANGE_PASSWORD = FALSE;
Note:
- Ensure to replace the password placeholder with a secure password of your choice.
- Use an existing default warehouse or create a new one if necessary Refer to Warehouse Creation.
- Using the created user, you will be able to authenticate the SDP Connector.
Database Creation
Create the database used for SDP data storage.
Note: If an existing SDP database and tables are being used, skip the database and table creation steps. Grant the required USAGE on existing Database, Schema, tables and object privileges to the integration role.
CREATE DATABASE YOUR_DATABASE_NAME;To verify the database creation, use the following statement:
SHOW DATABASES;Warehouse Creation
Create a warehouse to support the SDP integration.
CREATE WAREHOUSE YOUR_WAREHOUSE_NAME
    WITH
        SIZE = 'SMALL'
        AUTO_SUSPEND = TRUE
        AUTO_RESUME = TRUE;
Note: If a custom warehouse is used instead of the default warehouse, use that warehouse while creating the user and granting warehouse usage to the role.
To verify the warehouse creation, use the following statement:
SHOW WAREHOUSES;Schema Creation
Create a schema to organize the database objects for SDP data storage.
Note: If a custom schema is used instead of the default schema, use that schema while creating tables and granting usage to the role.
CREATE SCHEMA YOUR_DATABASE_NAME.YOUR_SCHEMA_NAME;To verify the schema creation, use the following statement:
SHOW SCHEMAS;Incident Table
Create a table to store Incident Reports.
Note: The sample table definition includes commonly used incident fields. Users may add or remove columns based on the data synchronized from ServiceDesk Plus Cloud and the requirements of the selected incident templates.
CREATE TABLE YOUR_DATABASE_NAME.YOUR_SCHEMA_NAME.YOUR_TABLE_NAME (
    ID          STRING,
    DISPLAY_ID STRING,
    SUBJECT     STRING,
    STATUS      STRING,
    PRIORITY    STRING,
    URGENCY     STRING,
    CATEGORY    STRING,
    SUBCATEGORY STRING,
    ITEM        STRING,
    REQUESTER   STRING,
    ASSET STRING,
    TECHNICIAN STRING,
    CREATED_TIME STRING
);
To verify the table creation, use the following statement:
-- Verify table structure
DESC TABLE YOUR_DATABASE_NAME.YOUR_SCHEMA_NAME.YOUR_TABLE_NAME;
Change Table
Create a table to store Change Management records.
Note: The sample table definition includes commonly used change fields. Users may add or remove columns based on the data synchronized from ServiceDesk Plus Cloud and the requirements of the selected change templates.
CREATE TABLE YOUR_DATABASE_NAME.YOUR_SCHEMA_NAME.YOUR_TABLE_NAME (
    ID           STRING,
    DISPLAY_ID STRING,
    SUBJECT      STRING,
    STATUS       STRING,
    PRIORITY     STRING,
    URGENCY      STRING,
    CATEGORY     STRING,
    SUBCATEGORY  STRING,
    ITEM         STRING,
    CHANGE_OWNER STRING,
    REQUESTER    STRING,
    CHANGE_TYPE STRING,
    STAGE STRING,
    CREATED_TIME TIMESTAMP
);
To verify the table creation, use the following statement:
-- Verify table structure
DESC TABLE YOUR_DATABASE_NAME.YOUR_SCHEMA_NAME.YOUR_TABLE_NAME;
Role Creation and Permissions
Create a role for SDP and assign the required permissions to the User, Database, Schema, and Tables.
Note:
- Ensure to replace the placeholders with your actual values.
- While granting usage/privilege for warehouse, use the same warehouse name as provided in the user creation step Refer to User Creation.
- While granting usage/privilege for schema, use the same schema name as provided for the tables.
To create the role, use the following statement:
CREATE ROLE YOUR_ROLE_NAME;To assign the role to a user, use the following statement:
GRANT ROLE YOUR_ROLE_NAME TO USER YOUR_USER_NAME;To assign the default role to a user, use the following statement:
ALTER USER YOUR_USER_NAME
SET DEFAULT_ROLE = YOUR_ROLE_NAME;
To grant usage on a Warehouse to the role, use the following statement:
GRANT USAGE
ON WAREHOUSE YOUR_WAREHOUSE_NAME
TO ROLE YOUR_ROLE_NAME;
To grant usage on a Database to the role, use the following statement:
GRANT USAGE
ON DATABASE YOUR_DATABASE_NAME
TO ROLE YOUR_ROLE_NAME;
To grant usage on a Schema to the role, use the following statement:
GRANT USAGE
ON SCHEMA YOUR_DATABASE_NAME.YOUR_SCHEMA_NAME
TO ROLE YOUR_ROLE_NAME;
To grant usage on a Tables to the role, use the following statement:
GRANT SELECT, INSERT, UPDATE
ON ALL TABLES IN SCHEMA YOUR_DATABASE_NAME.YOUR_SCHEMA_NAME
TO ROLE YOUR_ROLE_NAME;
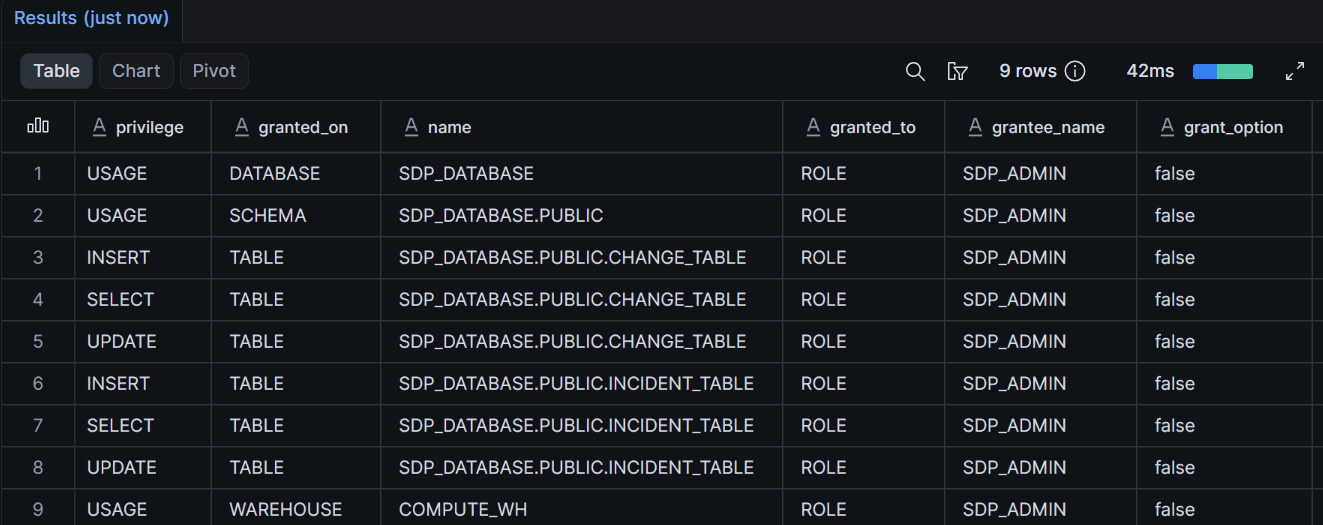
To verify the grants on the role, use the following statement:
SHOW GRANTS TO ROLE YOUR_ROLE_NAME;Note: Verify that the YOUR_ROLE_NAME role has the required privileges on the warehouse, database, schema, and incident/change tables as shown in the image below.
Connection in SDP
In SDP, go to Connections, click Connect, and configure the authorized Snowflake connection using the Client ID and Client Secret generated by the OAuth Security Integration in Snowflake.Refer to Connection Configuration
Frequently Asked Questions (FAQs)
Why is the Snowflake Admin Widget not loading data?
The Admin Widget requires a valid OAuth connection and Snowflake configuration. Ensure that:
- The OAuth connection is authorized.
- The Snowflake Domain URL is correct.
- The Database, Schema, and Table are configured.
- The integration is enabled.
Why are my databases, schemas, or tables not displayed or not loading in the Admin Widget?
Verify that:
- The OAuth connection is authorized.
- The integration user has the required permissions on the Database, Schema, and Tables.
- The selected role has the required USAGE privileges on the Warehouse, Database, and Schema, and the required privileges on the configured tables.
Can I use an existing Snowflake Database and Tables?
Yes. If your Database, Schema, and tables already exist, you do not need to create new ones. Simply grant the required privileges to the integration role and configure the existing objects in the Admin Widget.
Can Incident and Change data use different databases or schemas?
Yes. Incident and Change modules can be configured with different Databases, Schemas, and Tables if required.
Why are no historical incidents or changes displayed?
Historical records are displayed only when matching data is available in Snowflake. Verify that:
- Data has been synchronized to the configured Snowflake tables.
- The required templates are enabled.
- The required field mappings are configured.
- The selected incident or change has matching historical records based on the configured template criteria.
Why are field mappings required?
Templates use the configured field mappings to match ServiceDesk Plus fields with their corresponding Snowflake columns. If a required field is not mapped, the template may not return results.
What happens if an optional criterion is not mapped?
Optional criteria are ignored during matching. Only the mapped criteria are included when building the query.
Can I modify the Incident or Change table structure?
Yes. The sample table definitions are provided as a reference. You may add or remove columns using column chooser based on your organization's requirements. Ensure that any fields used in templates are available and mapped correctly.
Which Snowflake role permissions are required?
The integration role should have the following permissions:
- USAGE on the Warehouse
- USAGE on the Database
- USAGE on the Schema
- SELECT, INSERT, and UPDATE privileges on the configured tables
Refer to the Role Creation and Permissions section for the required SQL statements.
What should I do if OAuth authorization fails?
Verify the following:
- Client ID and Client Secret are correct.
- Authorization and Token Endpoints are copied from the Snowflake Security Integration.
- Redirect URI matches the value configured in the Security Integration.
- The integration user exists and has the required role assigned.
Refer to the OAuth Security Integration and User Creation sections for more details.
Where do I find the Client ID, Client Secret and domain for the SDP connection?
Run these statements in Snowflake after creating the OAuth Security Integration:
SELECT SYSTEM$SHOW_OAUTH_CLIENT_SECRETS('YOUR_INTEGRATION_NAME');returns the Client ID and Client Secret.DESC SECURITY INTEGRATION YOUR_INTEGRATION_NAME;returnsOAUTH_AUTHORIZATION_ENDPOINTandOAUTH_TOKEN_ENDPOINT. The domain in these URLs is the value to enter in the SDP connection.
Refer to the OAuth Security Integration section for details.
Which Snowflake user should I sign in with when authorizing the connection?
Sign in with the dedicated integration user created in the User Creation step (for example, SDP_INTEGRATION_USER). The connection works with the role and warehouse assigned to this user, so make sure the role has the required privileges.
Why is the mapping for "id" mandatory?
The Incident Id / Change Id and Created Time mappings act as the key identifier used to update existing records from SDP in Snowflake. Without them, SDP cannot match a record to its row in the table. Refer to the Criteria Mapping Reference tables in the Incident Templates and Change Templates sections.
What does each template show?
- Similar Incidents – Past incidents that match the configured criteria.
- Requester History – Incidents previously raised by the requester.
- Requester Similar Incidents – Recurring issues from the same requester that match the criteria.
- Major Incidents – Past high-impact incidents with similar priority and urgency.
- Change Failure Trends – Failed changes, failure rate and month-wise trend.
- Similar Changes – Past changes that match the configured criteria.
The Snowflake connection stopped working after some time. What should I do?
The authorization may have expired or been revoked. In SDP, open the Snowflake connection, click Connect, and authorize again with the integration user. Also confirm that the Security Integration is still enabled and that the user and role have not been changed or dropped.
Does the Snowflake warehouse need to be running all the time?
No. The sample warehouse is created with AUTO_SUSPEND and AUTO_RESUME enabled, so it starts when a query runs and suspends when idle. The integration role must have USAGE on the warehouse, and it must be the same warehouse set as the user's default warehouse.